Doing a jobbaord with Joomla! and Flexicontent part 5
This article is a basic translation of french to english (it's an old article, sorry for that), all screens are little old but all is writting here is ok for Flexicontent 3 series
In the last issue we created and configured our content types now, we will take care of category management.

In Joomla! It is often a simple and uninteresting operation to set a category, it is often used as a simple folder to display a list of articles, even to categorize its articles and sort them in the admin. But in FLEXIcontent the possibilities are increased tenfold for several reasons:
- The contents can be in several categories at the same time and without copy ...
- The possibilities of ordering articles are much more extensive (with specific options for the user at the front)
- You can add post it notes of the type "recently added" or the necessary level of access
- You can display articles requiring a higher level of access which will force your user to log in if they want to know more
- And above all, you will be able to activate the multi-value search and filtering of FLEXIcontent, one of the most powerful for a Joomla component!
Here is the daily menu:
- Category administration
- The settings of a category
- Header display
- Filtering and search
- Layout
- Content List
- Management of rss feeds
- Inheritance and copying of settings
- Category template management
- Creating a link to your category
- The case of the CV databaseDescription of categories
- Category "Job offers"
- Category "Applications"
- Templates
- Link to the offers (general public)
- Link to the open application (general public)
- Apply link (registered user)
- Link to applications (frontline recruiter)
- Link to the creation of an offer (frontline recruiter)
- Link to the management of offers (recruiter in front)
- Link to my applications (applicant)
Well a little reminder before you start! The legacy of FLEXIcontent for the category part, remember, read the previous articles?

Global Configuration> Category> Menu Link
Always important to be able to be in the legacies
Category administration
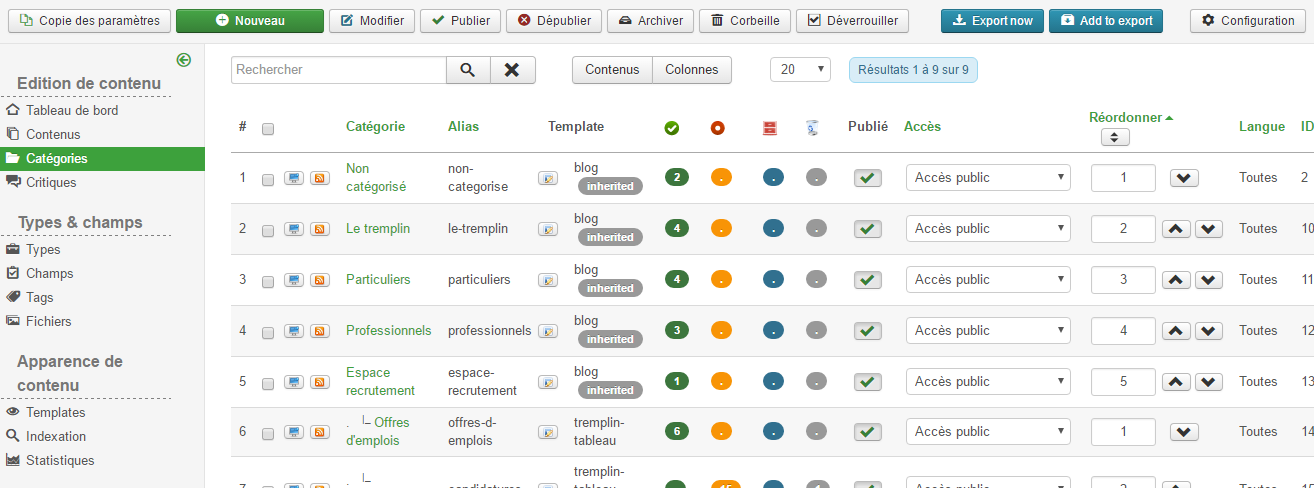
Things are already changing, because the FLEXI categories dashboard is much more complete:
Full search and filtering engine in a slider

Preview button, template edition, article report etc

Management of dynamic display of columns (linked to the user)

Perfect for managing large sites!
The settings of a category

Now here you are creating a category ... I won't offend you by explaining that you have to click on New.
In the image above we can see 3 areas:
The upper zone for what is mandatory, the name, the status, the parent category ...
The left area which allows you to manage the descriptions, the representative image etc ... the only tab specific to FLEXIcontent will be the notification part! And yes, we will be able to create specific notifications by category!

And here is the third area, the real power of FLEXI, the right panel which will allow you to manage all the specific functions such as filtering, posting of articles, the template ...
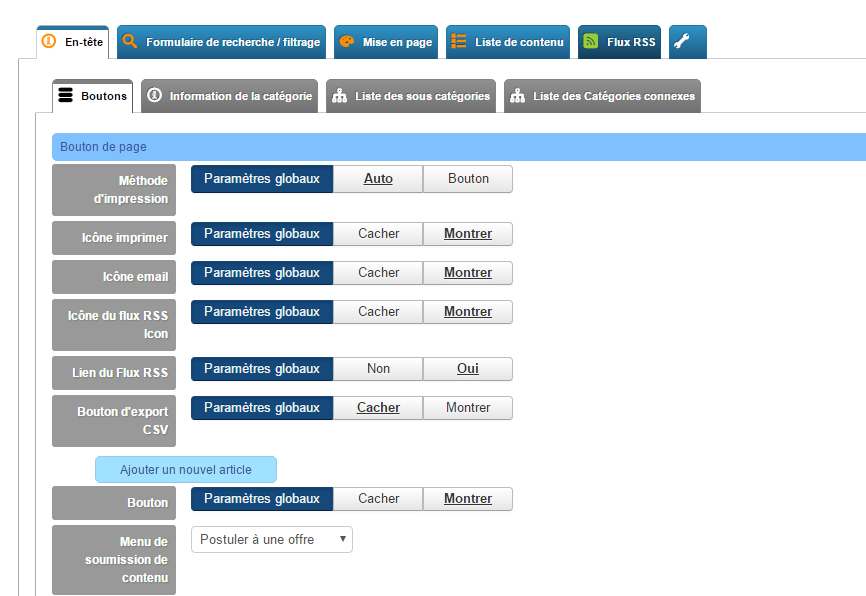
A small note, version 3.1 of FLEXIcontent adds 2 big new features:
The massive use of tabs to group options and avoid having pages that are too long to unwind

The option legacy display! very practical: it displays the value of the option that has been set in the global configuration.
ex:

In the global configuration the email icon has the value “show” so it will be displayed.

Okay now we start the song
Header display
The header is located between the category title and the filtering area, this will allow you to display options that are out of filtering and out of the list of articles.

You can easily manage buttons such as the rss button or an add content button ...

the whole being highly customizable with the management of bootstrap icons!
In the category information part you will be able to manage the display of the current category, as is done in Joomla! but more complete and directly in the category, not in the menu link. More logical ...
In the subcategory part you will be able to choose how the list of subcategories is displayed. With or without the number of articles, with images etc ...
You can even create your own display with the prefix and suffix options
Then comes the case of related categories.

WTF ?? in fact if we display the subcategories of a category, no problem we can have a display like this:
For a tree structure of this type:
Footwear
|_ Women
| _ Male
| _ Child
We will see the parent category and the child categories:
Shoe
Women | Man | Child (a link allowing to change category)
But if we go into the Woman category then we will only see the current category:
Femme
It's a shame: you have to go back to your shoe to switch to Child ...
Displaying related categories will display all categories at the same level, so this will display for the example above:
Women
Man | Child
Not bad for creating complex navigations without having to do 50 menus!
Filtering and search
Now we continue with one of the most interesting functions of FLEXIContent, the search and the filtering.
Small reminder: any field of a type can be used as a filter or as an element of textual search, and that for the category view or for the advanced search, it is up to you to define it in each field. From that point on it will be indexed in the results of the site's internal index.

Here is what it gives:

the basic tab will allow you to manage the display of the filtering area:
- online or in an opening panel
- validation button classes
- the display of input aids
 the prefixes and suffixes between each element
- This is also where you will find the automatic validation option, meaning that the results will be automatically updated with each filter change.
In the search section you can adjust the text search field

The most important options being:
- The method for word combination
- Automatic suggestion of results during input
In the “filter fields” part you will be able to display the fields for filtering the results:

nothing too rocket science but it remains highly configurable!
Note two special options:
- the initial value of the filter is used to initialize the display of the list according to the value in fields, such as for example displaying a car list with the value "red" for the field "color". After loading the page, the "color" filter can be modified by the user
- The blocked value of the filter allows the same as the initial value BUT the value of the filter will not be modifiable by the user
This is very practical as it avoids having to create categories to isolate content.
For example
- 1 “car” category with a “brand” field
rather than
- 1 “car” category with X sub-category per brand, it's much easier to upgrade and more powerful in terms of filtering.
Knowing that I have fields with linked dynamic values (eg 1 type => 1 mark => options) and that I can then create links to this category with preset filters from the menu links! (I'm getting carried away ... I will come back to this later for the management of the CV database)
In addition, we are not limited to a single field ... we can make combinations ...

A Doliprane ??

To finish with the search part we can define an alphabetical and numerical index

Nothing really bad about these options right?
Layout
In the layout part you will be able to choose a template and use these options:

Nothing complex, but it does not display your fields yet, we will see the management of templates a little later.
In the template selector part you will be able to give the possibility to change the template in the public part, for example going from a content list type template (default) to blog (blog)
Content List
It is in this part that you will be able to build the list of articles

You will be able to manage the buttons, the title, the automatic splitting of the contents, the “read more” etc… ..

But also sorting, because in addition to classic joomla sorting you will have access to more sorting AND especially the possibility of sorting content according to the fields of FLEXIContent
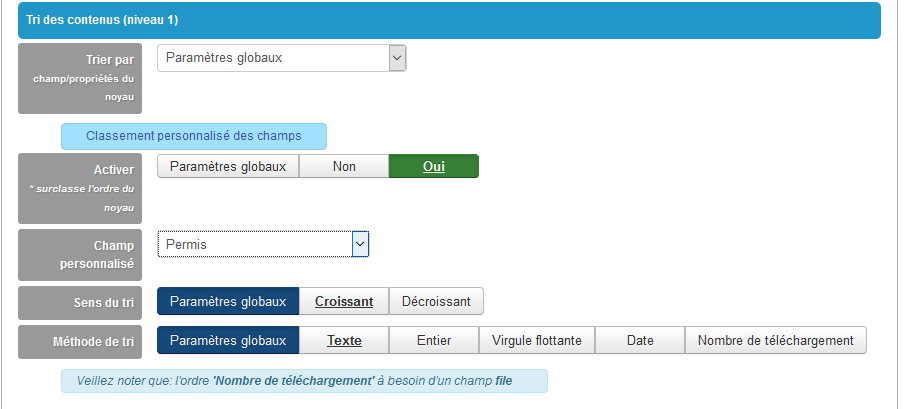
You can even work on a second level of sorting. But what can it be used for ... quite simply to create a sort of the type “the last models added” but in alphabetical order, so the last “Audi” will be before the last “Renault” ...

as well as display sorting options for your users

The possibilities for a directory or an intranet are very numerous
In the Pagination part you will be able to define the number of contents to display, the fact of being able to explore subcategories etc.

The post-it part is quite nice, it will allow you to display labels next to the titles:

We have available:
- Featured
- Access level (displays the necessary access level)
- Recently added (displays dynamic duration)
- Recently changed (displays dynamic duration)
All customizable and translatable by Joomla language files
So for example this setting will show the mention "added for X days" (rather than a date which will force to mentally calculate the interval between this date and the current day) next to our offers. Convenient for users, right?


In the general option part you will be able to manage SEO and comments:

Management of rss feeds
Come on, like it
there is not enough we can do almost all these settings but for the RSS part. Each category will have independent settings for generating an RSS feed:
- Title
- Number of content
- Type of text
- Picture
- Flexicontent field
- Sorting (2 levels)
Inheritance and copying of settings
Okay now that we have managed the options it is often tedious to recreate categories with the same parameters or how to make a category automatically inherit the options from another category. Here is yet another unrecognized function of FLEXIcontent:

In the tool tab you will be able to choose 2 options:
- option inheritance, ie if the default options come from the general configuration or from another category => this inheritance will be dynamic!
- copying the settings of a category at a time T
With this it becomes easy to create complex settings and deploy them intelligently in subcategories
Category template management
So now that our category is created we will FINALLY see how to manage templates in FLEXIcontent. I'm not going to teach you how to code it (if you are interested we can create another series of articles on content templates and field templates ... show yourself in the comments), but I will explain how we manage the choice of template and display of special fields.
For a FLEXI template there are always 2 views:
- Category view
- The article view
The category view applies to a ... (drum roll)
Well, not the same joke twice.

But what you need to know is that I can apply a view for a template to a category and another for articles. With the power of overload it becomes easy to display a calendar in so many different ways without duplicating categories or content.
Just go to the left panel, and in

We get a list of templates:

By default there are 4 for category:
Grid, a new template with powerfull grid system (mansory, overlay and more)
![]()
Table
![]()
Faq
![]()
items-tabbed : display item with tab
![]()
And one for item
![]()
As you can see some templates sometimes share the same article view. As you can mix the different views, it's easy to choose the one that suits you. All these views are responsive and each will have its options, and its positions.

But what is a position ???
If you are familiar with Joomla! the term "position" refers to an area used to display a module. In a Flexi template, this is an area for displaying fields ... It's very simple: each template contains X areas, if an area contains a field then its content will be displayed on the site.

- On the left, the available fields (sortable according to the types of content)
- On the right the positions of the template.
- Drag & drop your fields in the right part ...
- Save ... it's done!

Note: there is a special position, the "rend only", it will be useful for those who want to develop small functions such as displaying a position if a non-displayed field is active ... Yes, it is possible. If it's a bit obscure, I'll get to that later ... I can't explain it all to you all at once, can I ?!
Now each template has specific options that will allow you to manage image extractions, colors, “read more” links etc….

So these options will be very practical for generating views quickly but also these options can be overloaded in 2 places:
- In the category
- In the menu link (we find the native logic of Joomla!)
So this will allow you to use 1 template in a different way depending on the menu links or the categories ...
Since the last version of FLEXIcontent you will have css style options directly integrated into the template. No more coding style sheets for the most common changes:

Of course, if you want more you have the last tab which allows you to edit templates directly from your administration!
You can add positions in your templates using the input help (preformatted code to copy / paste in your files)

So creating templates for FLEXIcontent is quite simple, from creating a position to adding a manageable function, anything is possible! Have fun and share.
I say it again, but if you want a special template tutorial, please express yourself in the comments ;-)

Creating a link to your category
Now that we have created and configured a category we will need a menu link to display it. Well the basis is Joomla! I ignore it
- we make a link then we select the type FLEXIContent -> Category
- we choose its category as in Joomla!

There if your category is set (see above) no need to touch anything.
But if I need to change options for a given page (order, filtering, template etc) I can activate the overload at the menu level.

which will bring up all the FLEXIContent options for the current category

It will work like all of the options above.
This will allow you to create totally different displays from just 1 category.
This sounds complex to you, but in fact you will see that it is very practical!
The case of the CV database
Description of categories
So, for our practical case, I propose 1 category “Recruitment area” with 2 subcategories “Offers” and “Application”

This will facilitate the management of backend content, the backend space not being used to display things in the front end
Category "Job offers"
This category will be used to display job offers and to apply. In the “header” part I hardly make any changes because I just want to display 1 category title, no secondary or related category.

The only function I add in this part is the “Add” button that I link to a menu link allowing to add an offer (I will come back to this later), this will allow the recruiting manager to add an offer easily without access to the backend.
In the filtering part I start with a direct display of the fields, no slider on the search area. I put an automatic validation so that each filtering action makes the list refresh (to be tested.

I hide the submit form button and the "cancel" button because I find it more in line with automatic validation (a matter of taste)

For the search field part, I stay on the classic

Go now we will adjust the filtering part of the search engine

Not very hard!
And since I didn't need an alphabetical index, I turned off
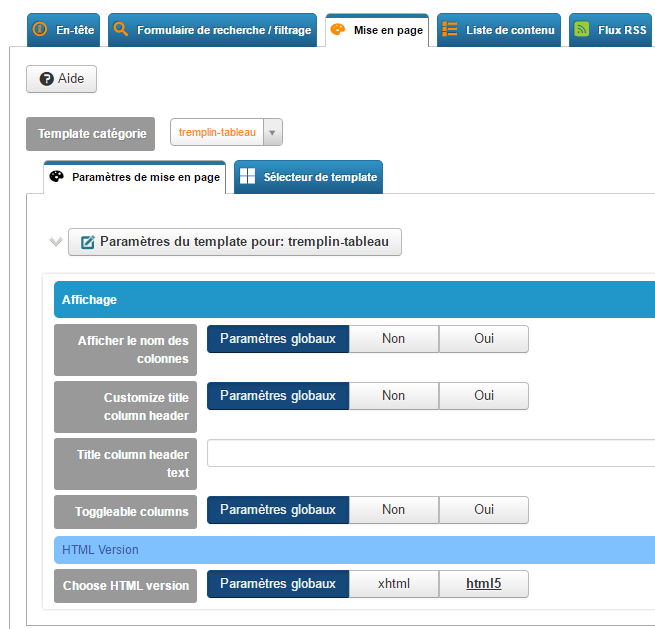
In the layout part, I used a "default" template (I duplicated it to add things) to have a display in table format
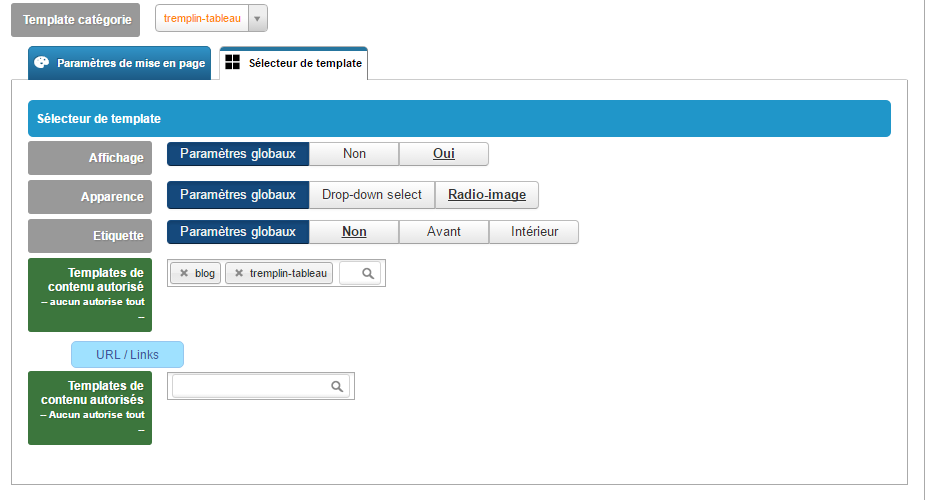
And I enabled the template selector so that users can switch between a board view and a blog view.

or

In the "Selection and pagination" section, nothing special, it's up to you!
In the post-it part you can add the “recently added” one, it could give this:

Same for rss feeds, I leave you free to do what you want
Category Applications
For the applications part, the objective is to list the applications for the person who takes care of the recruitment, we will therefore make a similar adjustment, except that we do not need an “Add an application” button, we must activate other filters and we can add an alphabetical index

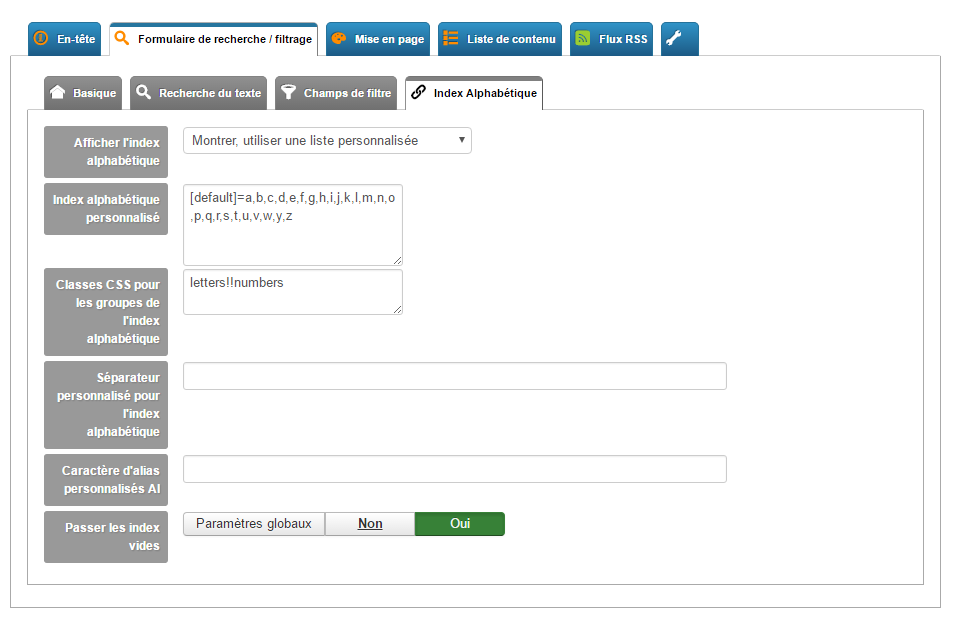
I used the custom setting to remove the numbers from the list.
The result is the following:
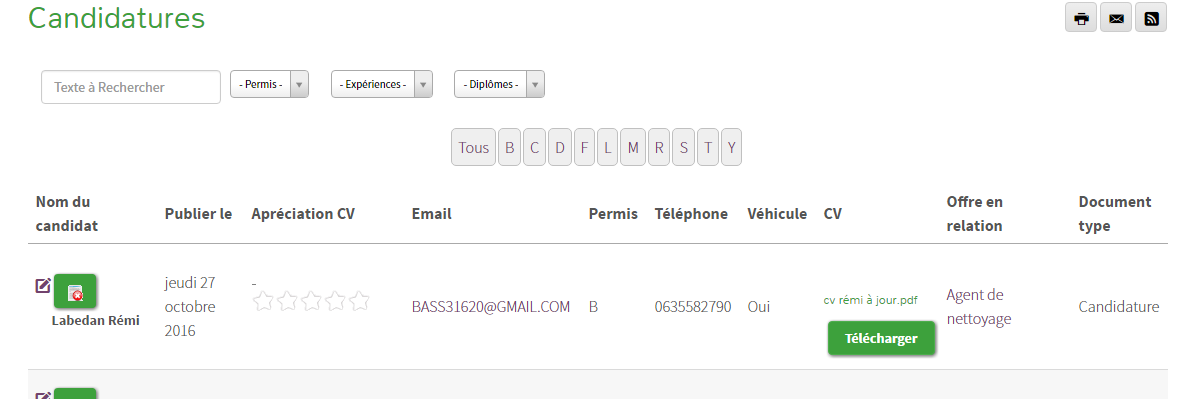
Of course, this view will only be accessible by users who are part of a "recruitment" group created in the user management of Joomla !.
Templates
Here are now the template settings. So as not to stupidly describe screens, I will give you the screenshots of the settings. You will see which fields have been placed in which zones. Use the comments if it's not clear ;-)
Table view of applications and offers:

The blog view of offers:

The table view for the candidate:

The table view for the recruiter:

The view of an offer:

These are suggestions, but you can do whatever you want. Test, display, it's easy!
Now that everything is settled, we must move on to navigation, to access the various functions.
We will have 3 levels:
- the public which has access to the offers and has the possibility of applying in open candidacy
- the applicant has access to these applications
- the recruiter who has access to all offers and applications and has the possibility to add an offer
Link to the offers (general public)
For the link to the offers if your category is configured correctly, just make a link to your FLEXIContent category.
Link to the open application (general public)
There we will create a FLEXIcontent type menu link “submission form”. There are two ways to manage it, either create full ACLs per user group, or use the menu link overload options. As I'm a clever lazy guy ... the second solution is often the quickest.

In the first tab I set the type of content to “free application”
Then I adjust the presentation parameters of the form


Then in the "send / publish ACL" tab I go to d
under ACL rights to allow people to apply (“submission for unauthorized”> Yes)

As I do not want the Applications to be published, I leave the self-publication option on "no".
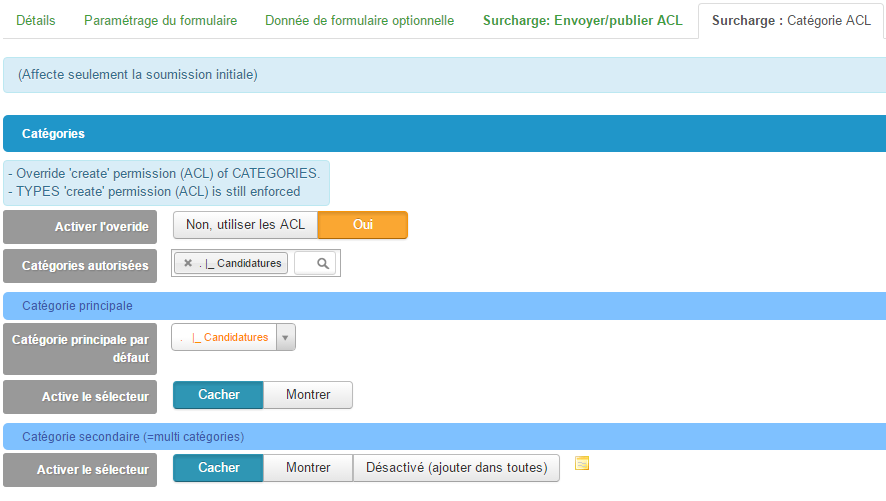
To put this application in the right category and prevent the person from choosing, we make these settings below:

And here is a beautiful form all ready!

Apply link (registered user)
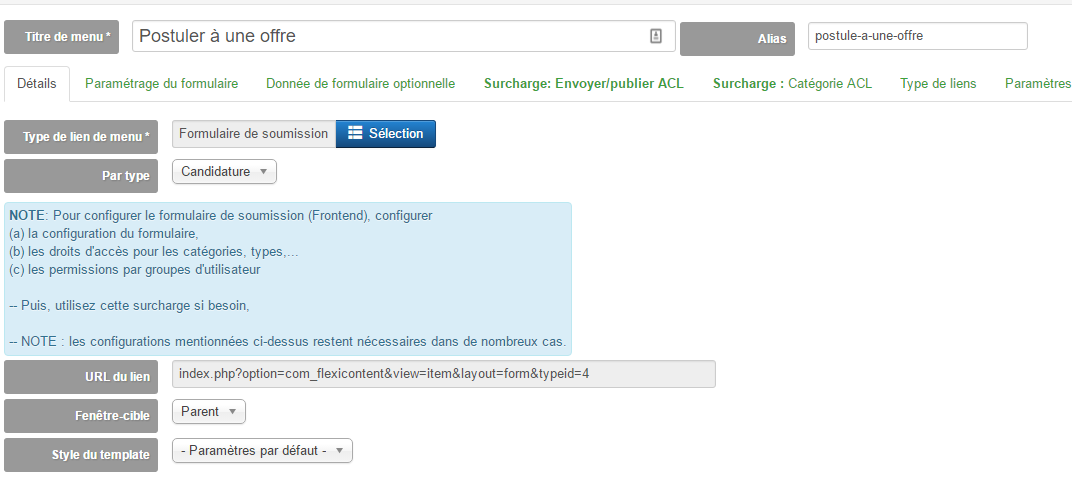
This is to create a menu link for job posting applications. The idea being that a person can apply directly from an offer. In the previous chapter, we created a connection field. IT has an option to display a button to submit automatically linked content. There we will create a menu link to make the settings and thus create the link between the two.


Link to applications (frontline recruiter)
Now we are going to create a link that will be accessible to the recruiter:

No need to overload, just set the appropriate level of access that you will have created previously.

Link to the creation of an offer (frontline recruiter)
Still the same, we are going to create a menu link to link it to the content creation buttons (remember, in the category configuration you can display an add button and choose the linked menu link)


Above you'll notice that I use ACLs, so my “recruiting” group has specific access to view and therefore submit this content.

Link to the management of offers (recruiter in front)
In fact it is the same link as for "public" users but with these accesses the recruiter will have more options (the add button, the edit buttons etc.)
Link to my applications (applicant)
We fine-tune by offering a user link, the idea being that the candidate can see these applications. Here too FLEXIcontent is equipped!
We make a "My Items" type link that will list the articles of the connected author, then we add settings like the following:

We filter according to the category.
Then you can make any settings you want as if it were a special category.

To make the display as light as possible, I turned off a lot of things. We get a view like this:

I chose the fields to display by duplicating a "default" category template and I chose the fields to display:

And that's it for the category part !!! You can see that you can build a powerful, no-line, complete CV database system with FLEXIcontent!

In the next and final article (unless you want more) we'll cover finishing touches like notifications, little additions, or ideas to go further that I haven't put together!


